
This lesson plan was written for Grade 6 – Lesson could be used with grades 5-8.
Grade Level Content Expectations
PERFORM
Standard 1: Apply skills and knowledge to perform in the arts.
Produce and exhibit a final product that demonstrates quality craftsmanship and technique at
a developing level.
CREATE
Standard 2: Apply skills and knowledge to create in the arts.
Identify, design, and solve creative problems at a developing level.
ANALYZE
Standard 3: Analyze, describe, and evaluate works of art.
Observe, describe, and analyze visual characteristics at a developing level.
Michigan Curriculum Standards - Arts Education
• Initiate new ideas employing inventiveness and innovation at a developing level.
• Describe ways in which the principles and subject matter of other disciplines taught in school are
interrelated with the visual arts at a developing level.
• Produce and exhibit a final product that demonstrates quality craftsmanship and technique at a
developing level.
Michigan Educational Technology Standards for Students (METS-S) 2009
Research and Information Literacy
• Use a variety of digital resources to locate information
Critical Thinking, Problem Solving, and Decision Making
• Gather data, examine patterns, and apply information for decision making using available digital resources
Cross-Curriculum Lesson Plan that incorporates math, visual, verbal and analytical skills within one art project. Additionally, it provides historical and cultural information about where mandalas originate and allows students to learn how to develop and write constructive, analytical and interpretive feedback on their peers’ artwork.
DAY ONE - Introduction
1. Introduce class to student-created sand mandalas by showing the video.
SEE: http://www.youtube.com/watch?v=94SU6hIIvu8
2. Encourage students to share their observation of the creative process.
ASK: What they noticed about the environment where the mandala was created.
Ask students to share words that describe the mandala to them.
3. Vocabulary Review and Discussion
VOCABULARY
Mandalas, Polygons and Symmetry
Geometry Terms
Circle – the set of all points in a plane a given distance from a given point
Congruent – equal measure
Hexagon – a six-sided polygon
Heptagon – a seven-sided polygon
Octagon – an eight-sided polygon
Parallelogram – a quadrilateral with both pairs of opposite sides parallel
Pentagon – a five-sided polygon
Rectangle – a quadrilateral with 4 right angles
Trapezoid – a quadrilateral with exactly one pair of opposite sides parallel
Types of Triangles
Equilateral – the set of all points in a plane a given distance from a given point
Isosceles – a trapezoid with the un-parallel opposite sides congruent
Right – a triangle with a right angle
Scalene – a triangle with no sides congruent
Triangle – a three-sided polygon
Mandala Terms
Deity – a god or goddess
Sanskrit – an ancient language that is classical
Tibetan monk – a native of Tibet who is a man belonging to a religious order
Art Terms
Pictorial – consisting of pictures
Abstract – a form with little or no pictorial representation
Symmetry – correspondence in size, shape, and position of parts that are on opposite sides of a
dividing center line.
4. Visuals plus directions. Watch me review the Step-by-Step Mandala directions and pictures from the link below. While going through these visual directions, vocabulary words will be recalled – circle, congruent, symmetrical, polygon names, triangle, abstract, etc. I will review what the terms mean as I see them being incorporated into the sample mandala.
Step-by-Step Mandala Construction
Mandala Directions
Step-by-Step Mandala Construction
Mandala Directions
DAY TWO – Technology (LOOK, OBSERVE SKETCH)
Students will work in the computer lab the remaining class time, storing visual images in their memory and sketching ideas they want to remember
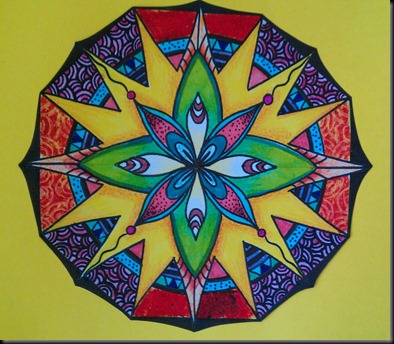
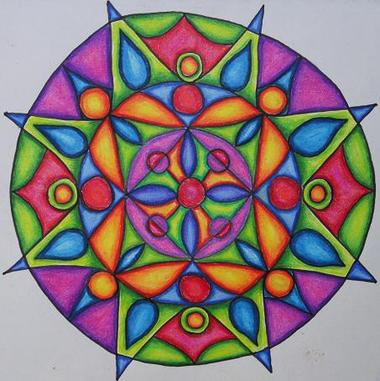
Nature is the inspiration for man-made mandalas.
Nature Mandalas Flower Mandalas Pattern Mandalas
Explore the Website – Images plus history and culture of mandalas.
The Mandala Project
Students will work in the computer lab the remaining class time, storing visual images in their memory and sketching ideas they want to remember
Students will work in the computer lab the remaining class time, storing visual images in their memory and sketching ideas they want to remember
Nature is the inspiration for man-made mandalas.
Nature Mandalas Flower Mandalas Pattern Mandalas
Explore the Website – Images plus history and culture of mandalas.
The Mandala Project
Students will work in the computer lab the remaining class time, storing visual images in their memory and sketching ideas they want to remember
DAY THREE – Instructional Input & Guided Practice
1. Distribute Mandala Directions Handout, Read Step-by-Step instructions while modeling how to do each step.
1. Distribute Mandala Directions Handout, Read Step-by-Step instructions while modeling how to do each step.
INSTRUCTIONS
Mandala Directions
1. Using a compass, draw an 8” (or larger) circle on white paper.
2. Divide the circle in half. Then into fourths. Then into eighths. Use a ruler. Draw light lines that can be erased later. Make sure the sections are even.
3. Draw a design using a ruler, compass, circle template, oval template in one of the eight sections of your design. Make sure you use at least 4 shapes. You can make up shapes.
4. Once the design looks complete in the first section, repeat the same design in the remaining 7 sections
5. Color and design using at least 4 colors.
6. Work slowly
7. If you have questions, please ask!
2. Distribute Colored Pencil Techniques Handout and Model each colored pencil technique listed
on my sample mandala
on my sample mandala
TECHNIQUES
FOR USING COLORED PENCILS
TIP #1- "Color Heavy"- or at least build up your color gradually so that the colors are intense and complex. Don't rely on the value of your paper to make your tints and shades.
TIP #2- "Layer Your Colors"- Build up many layers of your colors. Do not rely on just one application of color to bring you success. Building up and layering your colors will make your colors more complex and realistic.
TIP #3-"Mix Your Colors"- When using any colored medium, you should ALWAYS mix colors. Colored pencils are no different. For example, if you are drawing grass, don't just grab that manufactured green. Instead use blue and yellow, and green.
TIP #4- "Outline Last"- If you like to outline, wait and do it when you are finished drawing the object. Colored pencils can overlap themselves very easily, enabling you to outline objects last. (Don't use black to outline)
TIP #5- "Take Your Time"- Colored Pencils are a medium that demands time. You must work deliberately. It takes time to craft a well-drawn colored pencil image.
TIP#6- "Burnish"- By taking a white colored pencil or a colorless blender, smooth the colors and values out to make a consistent texture and solid finish.

3. Check for Understanding
4. Rough Draft Sketch – Begin today Independent Practice creating mandala shape, integrate design shapes and practice colored pencil techniques.
4. Rough Draft Sketch – Begin today Independent Practice creating mandala shape, integrate design shapes and practice colored pencil techniques.
DAY FOUR – Finish up Rough Draft Sketch. Begin Final.
MY OBJECTIVE – Observe, Question, Offer Feedback
MY OBJECTIVE – Observe, Question, Offer Feedback
DAY FIVE – Finish up Final Draft
Inform class of the details of Day 6 Activity – Art Evaluation Questions.
Inform class of the details of Day 6 Activity – Art Evaluation Questions.
DAY SIX – Art Evaluation Day
Students will be randomly paired up with another student’s art.
Students will each receive a copy of the Art Evaluation Question Prompts
I will read each question and model how to be descriptive, analytical and add personal interpretation
when evaluating art.
Each student will be required to answer 5 of the 8 suggested questions.
Questions need to be written in full statements. They will be graded.
ART EVALUATION QUESTIONS
RULE: Do not judge, Rather – describe, analyze & interpret!
Choose 5 of the eight questions listed below. Use the questions to evaluate the art in front of you. Use complete sentences and thoughts.
1. What stands out the most when you first look at the work of art? Why did you notice that first?
2. As you keep looking, what else seems important? Why does that thing you just mentioned seem important?
3. How has contrast been used? Talk a little about the color choices made.
4. What leads your eye around from place to place?
5. Does anything seem to be hiding in this composition? Explain what you see.
6. Image the feelings and meaning this artwork represents. Talk about them.
7. What titles could you give this artwork?
8. What other things interest you about this artwork? Be Specific. Be Thorough.
When students are finished writing we will complete an Oral Critique as a Follow-Up/Extension Activity
• Oral Critique – Present student’s art with answers to the evaluation questions.
• Oral Critique – Present student’s art with answers to the evaluation questions.
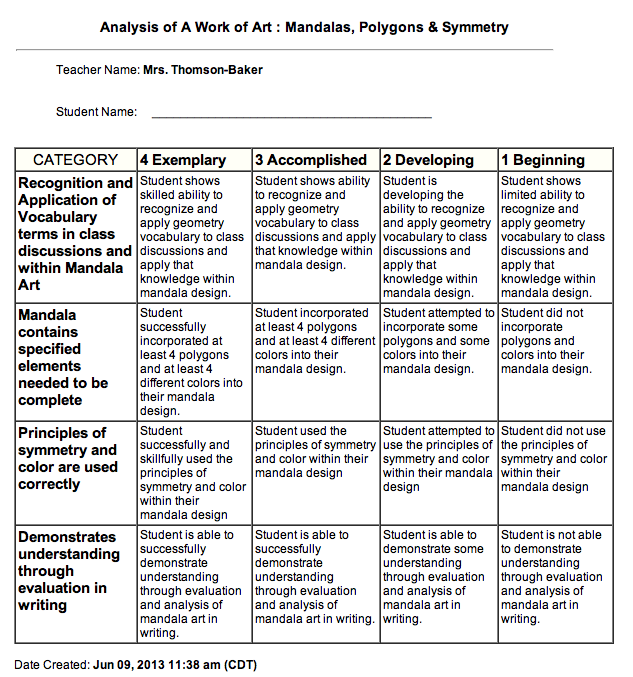
Assessment Rubric